Pages

Tuesday, October 19, 2021

Heffy Doodle Blog Hop!

Hello friends! I hope that your week is off to a good start. I'm excited to be sharing a card today for the Heffy Doodle Blog Hop! For today's special blog hop, you could win a £50 voucher to the Heffy Doodle store!


I have two cards to share today that use the Deer to Me stamp set. The deer in this set are just the sweetest, especially that little fawn sitting in the grass. 


This first card features an ink blended sky and three birch trees behind a grassy hillside. I stamped, colored the deer and images with Copic markers, die cut them, and attached them to the card with foam tape. I used the Hello Shadow Heffy Cut to cut the hello with gold cardstock and glued it to the background. The sub-sentiment is from the Deer to Me stamp set and is white heat embossed onto black cardstock. That sentiment is my favorite from the set!


My second card also uses the deer stamp set and hello die, but for this card, I ink blended a yellow and orange sky. I also created a card panel with a circle die cut in the middle to create a smaller scene on the card. I just had to use that sitting deer and I thought it was so sweet to have the deer looking at it's little mouse friend!


A blog hop isn't complete without a giveaway! To be entered to win the giveaway, all you need to do is comment at each stop along the Blog Hop before October 24th, 2021 at 11:59 PM EST. The winner will be announced on the Heffy Doodle Blog on October 25th at 10:00 AM EST.

You should have come from Koren Wiskman's blog, but here is a list of the blogs in case you get lost along the way:

Blog Hop Lineup:

Heffy Doodle Blog

Rachel Alvarado

Latisha Yoast

Elena Roussakis

Alberto Gava

Kari VanNoy

Amanda Stevens

Jessica Frost-Ballas

Koren Wiskman

Elise Constable


Thank you all for joining us on this blog hop today and I hope we have inspired you to create something fun! Have a great day! :)

Sunday, October 10, 2021

LF Inspiration Week: Jolly Christmas Tree

Good morning friends! 

My card today features the Jolly Christmas Tree die. This die is so fun because it cuts out an outline for the image. I used the die to create a white outline for my Christmas tree and colored the inside pieces with Copic markers because inlaying the pieces with the outline. For the garland on the Christmas tree, I used red sparkle cardstock to add some extra detail to the tree.


After the Christmas tree was created, I decided that it need a home to live in, so I used the new Window Frame die to create a window, curtains, and moon and stars for the sky. I used the Let It Shine Snowflakes paper for the wallpaper and Woodgrain cardstock for the hardwood floor. The background was die cut with the Outside In Stitched Rectangle die to give the scene a nice border on the card. I finished the card by adding a white heat embossed sentiment along the top from the Joy To All stamp set.


This mostly die cut card was a lot of fun to create and now has me wanting to decorate my Christmas tree at home!

I hope you all enjoy the rest of your weekend and I'll be back again tomorrow with more inspiration! :)


Supplies: Below is a list of supplies used for my project. Affiliate links are provided at no extra cost to you. Your support allows me to provide you with more inspiration. Thank you!

Black Licorice Cardstock
Shop at:
LF
Sparkle Cardstock - Holiday
Shop at:
LF
Woodgrain Cardstock - Neutrals
Shop at:
LF
White Embossing Powder
Shop at:
LF
Embossing Ink Pad
Embossing Ink Pad
Shop at:
LF
Outside In Stitched Rectangle Stackables
Shop at:
LF
Woodgrain Cardstock - Light Brown
Shop at:
LF
Let It Shine Snowflakes - Petite Paper Pack
Shop at:
LF
Joy To All
Joy To All
Shop at:
LF
Window Frame
Window Frame
Shop at:
LF
Jolly Christmas Tree
Shop at:
LF

Saturday, October 9, 2021

LF Inspiration Week: Magic Holiday Messages

 The Lawn Fawn Inspiration Week continues with a look at the Magic Holiday Messages stamp set. This set coordinates with the Magic Iris, but it can also be used on its own.


I created a mini slimline card so that I could fit three circles across the card. For the circles, I used Mermaid, Peacock, and Blue Jay cardstock and I white heat embossed the "let it snow" sentiment onto each one. Is the Christmas song stuck in your head now? It was stuck in mine while I was creating it!

After die cutting the circles, I attached them to patterned paper with foam tape, and then used double sided tape to add it to a white card base. I finished by adding a bunch of snowflakes and clear jewels around the sentiment, and tied a twine bow along the top.


Those sentiments are so fun in the circles and they are great for creating quick and easy Christmas cards. Make sure to check out the Lawn Fawn blog for more details!


Supplies: Below is a list of supplies used for my project. Affiliate links are provided at no extra cost to you. Your support allows me to provide you with more inspiration. Thank you!

Magic Iris
Magic Iris
Shop at:
LF
Blue Jay Cardstock
Blue Jay Cardstock
Shop at:
LF
Mermaid Cardstock
Mermaid Cardstock
Shop at:
LF
Peacock Cardstock
Peacock Cardstock
Shop at:
LF
White Embossing Powder
Shop at:
LF
Embossing Ink Pad
Embossing Ink Pad
Shop at:
LF
Blue Jay Ink Pad
Blue Jay Ink Pad
Shop at:
LF
Mermaid Ink Pad
Mermaid Ink Pad
Shop at:
LF
Peacock Ink Pad
Peacock Ink Pad
Shop at:
LF
Magic Holiday Messages
Shop at:
LF
Magic Holiday Messages Dies
Shop at:
LF

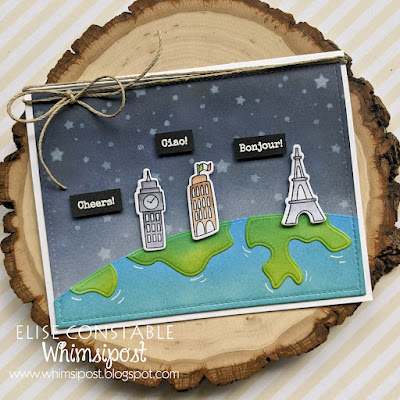
Cheers! Ciao! Bonjour! with Ellen Hutson

Hi everyone! Do you have any fun plans for the weekend? We're getting a bunch of small projects done around the house so that we can start working on our kitchen. We're getting new cabinets in a few weeks and I can't wait!!

In the meantime, I have another card to share with you that uses the new release from Ellen Hutson.


To start, I created the starry sky by ink blended distress oxide inks and using the Starry Sky stencil from Lawn Fawn with Yeti ink. I love how the stars look in that white ink. After the sky was created, I die cut it with the Outside In Stitched Rectangle die and attached it to a white card base.

Then, I used the Planet Surface die from Ellen Hutson to create the Earth surface. I ink blended the paper in green and blue inks to look like land and water. That is such a fun die set! Once the water and land was finished, I glued the Earth together onto the starry background.

The images and sentiments are from the Bear Ware Grand Tour stamp set. The landmarks are colored with Copic markers, and the sentiments are white heat embossed onto black cardstock. After die cutting the landmarks and cutting out the sentiment, I used foam tape to attach them to the card. I finished by adding a twine bow along the top.


It's not geographically accurate, but I like how it turned out. And everyone is saying hello from all over the world!

Thanks for visiting and have a wonderful weekend! :)


Supplies: Below is a list of supplies used for my project. Affiliate links are provided at no extra cost to you. Your support allows me to provide you with more inspiration. Thank you!

80lb White
80lb White
Shop at:
LF
Black Licorice Cardstock
Shop at:
LF
White Embossing Powder
Shop at:
LF
Embossing Ink Pad
Embossing Ink Pad
Shop at:
LF
Yeti (Pigment) Ink Pad
Shop at:
LF
Jet Black Premium Ink Pad
Shop at:
LF
Outside In Stitched Rectangle Stackables
Shop at:
LF
Distress Oxide - Black Soot
Shop at:
LF | EH
Distress Oxide - Chipped Sapphire
Shop at:
LF | EH
Distress Oxide - Faded Jeans
Shop at:
LF | EH
Distress Oxide - Lucky Clover
Shop at:
LF | EH
Distress Oxide - Mowed Lawn
Shop at:
LF | EH
Mini Ink Blending Tool
Shop at:
LF
Mini Ink Blending Foam
Shop at:
LF
Scotch Double-Sided Foam Tape
Shop at:
LF
White Gelly Roll Pen
Shop at:
LF
Starry Sky Stencil
Starry Sky Stencil
Shop at:
LF | EH

Friday, October 8, 2021

LF Inspiration Week: Window Scene: Winter

Hello everyone! I'm back today with a card set that uses the Window Scene: Winter stamp set from Lawn Fawn! This set is fun to help create quick and easy scenes. As the title suggests, it is used to create winter scenes, but by using different colors, you can also create an autumn themed card, too!


I started by stamping the window scene onto white cardstock and coloring the background with Copic markers. For the autumn scene, I added a pile of leaves and mouse from the You Autumn Know and the dog from Joy To All. It looks like they're having a blast in that pile of leaves!

The paper from the Sweater Weather Remix collection is perfect for fall cards, so I used the green for the scalloped border on the scene (that die is included in the window scene die set!) and the leaf and acorn paper for the background. I also used the yellow paper in that collection for the Scripty Hello sentiment since it coordinated perfectly with the other patterned paper! The "friend" sentiment is from the Thanks Thanks Thanks stamp set.


Sometimes I run out of design ideas, so I love it when I can find designs that can easily be switched up with different colors. That's what I did for the winter card! I used the same design but added a dog and bone from the Furry and Bright stamp set and colored the scene in cooler colors.

For this card, I used the patterned paper from the Let It Shine Snowflakes collection. The silver foil snowflakes are so pretty on that background paper! I used the Scripty Merry for the sentiment and added a white embossed "christmas" from the Window Scene: Winter stamp set.


So which season do you prefer - autumn or winter? Autumn is definitely my favorite!

Thanks for visiting today and check out the Lawn Fawn blog for more inspiration. You can also check out this Lawn Fawn video on how to recreate these cards!


Supplies: Below is a list of supplies used for my project. Affiliate links are provided at no extra cost to you. Your support allows me to provide you with more inspiration. Thank you!


80lb White
80lb White
Shop at:
LF
Black Licorice Cardstock
Shop at:
LF
White Embossing Powder
Shop at:
LF
Embossing Ink Pad
Embossing Ink Pad
Shop at:
LF
Jet Black Premium Ink Pad
Shop at:
LF
Scripty Hello
Scripty Hello
Shop at:
LF
Scripty Merry
Scripty Merry
Shop at:
LF
Thanks Thanks Thanks
Shop at:
LF
Sweater Weather Remix - Petite Paper Pack
Shop at:
LF
Let It Shine Snowflakes - Petite Paper Pack
Shop at:
LF
You Autumn Know
You Autumn Know
Shop at:
LF
You Autumn Know Dies
Shop at:
LF
Joy To All
Joy To All
Shop at:
LF
Joy To All Dies
Joy To All Dies
Shop at:
LF
Furry and Bright
Furry and Bright
Shop at:
LF
Furry and Bright Dies
Shop at:
LF
Window Scene: Winter
Shop at:
LF
Window Scene: Winter Dies
Shop at:
LF